
No recent searches
Popular Articles

Sorry! nothing found for
SceneForge Concepts --> Cameras and Recording
Modified on Fri, May 10, 2024 at 3:58 PM
Cameras and Recording

Judah Mantell
Last Update 2 years ago
Cameras in SceneForge allow you to record video and take still images in various aspect ratios, framerates, and resolutions. Many of the properties of virtual cameras in SceneForge are based on that of a physical camera.
Camera Types
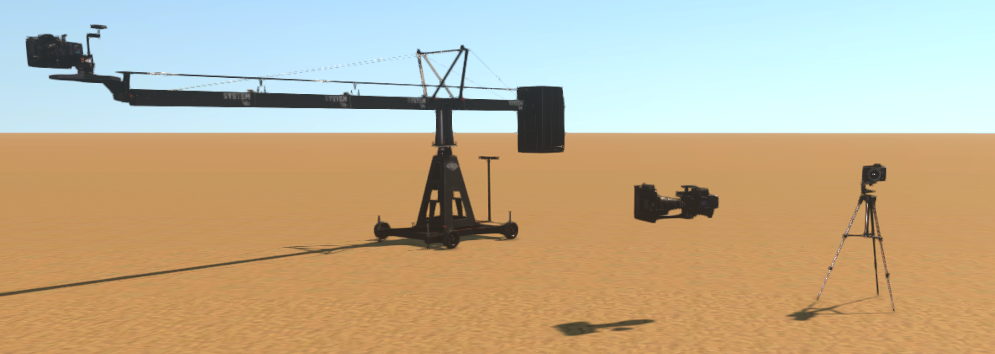
Tripod and Crane Cameras are mainly meant for pre-vis and shoot planning. For camera tracking, compositing, and timeline animation, the Free Camera should be used. Otherwise, you'll end up with some pretty undesired results!
Camera Properties
Cameras have five main properties that can be adjusted per camera, and the viewfinder has properties that apply to all cameras in the scene. It's important to note that these properties aren't intended to be fully physically accurate, rather be an easy way to adjust the way your focal plane will look.
Tables can't be imported directly. Please insert an image of your table which can be found here.
The other set of camera properties can be found in Shoot Mode and are as follows:
Tables can't be imported directly. Please insert an image of your table which can be found here.
Recording
When pressing the record button in Shoot Mode, SceneForge will begin recording the camera's movement to either keyframes or clips on its linked timeline layer.
This is what gets played back on the timeline, and gets rendered out when exporting. Because of the high frequency that SceneForge records the motion, it is recommended to only use this when using the Camera Tracking functionality.
For more simple camera panning, trucking, dollying, etc, it is recommended to use transform keyframes.
See the Timeline page for more info.
Exporting Stills
To export still images, you have two options:
- Simply clicking the white capture button, which snaps a 1080p image (and makes it available in Storyboard Mode)
- Clicking the "Render View" button and manually selecting a resolution.
This issue is not present when exporting to the EXR format via the Render Menu (Pro Only).
Exporting Video
To export video, you can either record 1080p footage in real-time (by checking "Realtime Video"), or by clicking the "Render View" button.
When exporting, SceneForge will use the Render Start and Render End values set to the right of the Timeline Panel. If both are set to 0 (default), SceneForge will render the entire timeline from start to finish unless it is ended prematurely.
The Render Menu
To open the Render Menu, click the "Render View" button in Shoot Mode. This menu has a number of options as described below:
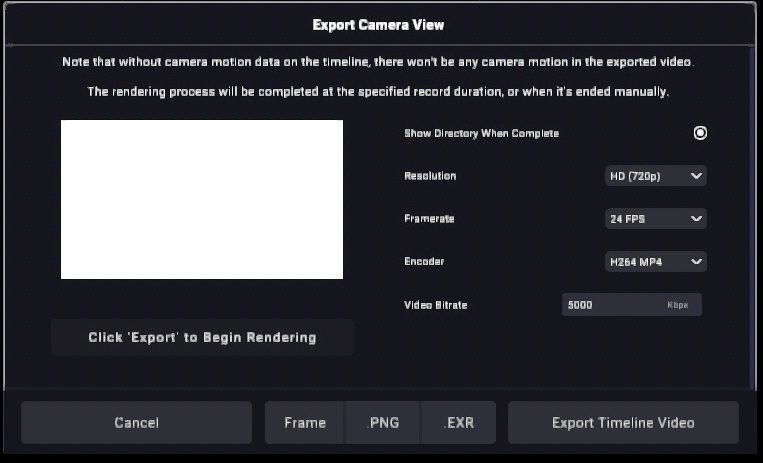
On the left there is a preview of what is currently being exported.
Tables can't be imported directly. Please insert an image of your table which can be found here.
Depending on the platform, different encoders will be available.
The currently supported options are as follows:
Tables can't be imported directly. Please insert an image of your table which can be found here.
You can read more about the differences between these two here.
Learn more about bitrates here.
Learn more about encoding here.
At the bottom of the menu, you can close the menu, export a still frame in either PNG or EXR format (Pro users only), or begin the video render process.
The Video Render Process
As opposed to the realtime recording option in Shoot Mode, exporting via this menu uses an offline rendering process, meaning it ensures that the previous frame is 100% finished before moving onto the next one.
The time
this process takes depends on the options selected above.
For example, higher framerates and resolutions take longer to export for obvious reasons.
After clicking Export Timeline Video, SceneForge will go through every frame of the timeline, then Mux and Encode that to a video file. Closing SceneForge or turning off your computer will end this process.
Was this article helpful?
That’s Great!
Thank you for your feedback
Sorry! We couldn't be helpful
Thank you for your feedback
Let us know how can we improve this article!
Feedback sent
We appreciate your effort and will try to fix the article
X