
No recent searches
Popular Articles

Sorry! nothing found for
Getting started --> The SceneForge Editor
Modified on Fri, May 10, 2024 at 3:57 PM
The SceneForge Editor

Judah Mantell
Last Update 2 years ago
The editor has three modes. The mode can be changed by selecting an option from the left of the main toolbar at the top of the editor window.

Tables can't be imported directly. Please insert an image of your table which can be found here.
Each mode is described in their own article linked below.
In addition to switching between the modes, the toolbar can also switch between project scenes, change settings, and save your project, among other options.
You can also save your project by clicking Ctrl/Cmd + S.
Scene Selection and Creation
On the right hand side of the toolbar is a scene selection dropdown.
This allows you to change which scene of your project is currently active.
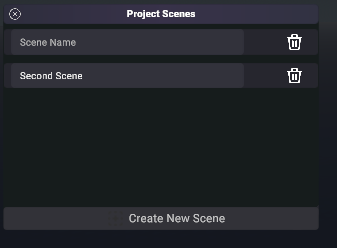
At the bottom of this menu is an option to view all scenes in the project.
Here you can delete, rename, or add scenes to your project.
You can switch scenes by clicking one of these buttons as well. You cannot delete the only scene in your project or the currently active scene.
Editor Settings
When clicking the settings icon in the top toolbar, a popup menu will appear. Here you have various options that will affect the entire editor no matter what project is active.

Tables can't be imported directly. Please insert an image of your table which can be found here.
Was this article helpful?
That’s Great!
Thank you for your feedback
Sorry! We couldn't be helpful
Thank you for your feedback
Let us know how can we improve this article!
Feedback sent
We appreciate your effort and will try to fix the article
X